
Running your application on the container in an orchestrated environment has many benefits, but it is not always a straightforward task. To ensure you spend most of the time in the development of your application and not setting up a deployment we have created a template on Github.
Here is the link https://github.com/MeghaRawat3/EasyCon that will help you:
- Deploy your application on a container and push it to Docker Hub
- Setup a Kubernetes cluster of your using ansible
- Deploy the container image on that cluster
Important note: We have assumed you have a repository setup on GitHub with the CI configured using GitHub Packages.

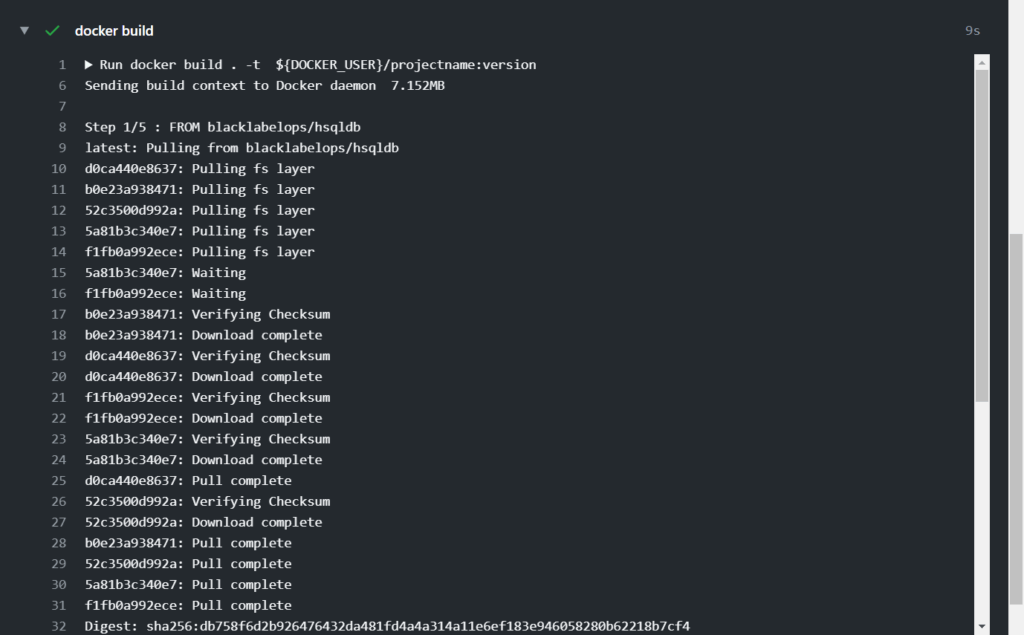
Docker build and push
The first step would be to package your application in an Ubuntu container. To do that we use the docker build command.
Docker build creates an image of a container based on the properties specified in a Dockerfile. In our repository we have already created a Dockerfile. Place this Dockerfile in your project directory. This is a very basic file to create a container for your application. It copies the Jar file built by your application from the target directory to the root of the container then executes it, exposing the 8080 port.
After the image is built, we need to push it to Docker Hub. This will help us later pull it on our Kubernetes pods.
This is done using the simple docker push command.
Doing this manually is easy, but we might have to repeat this process many times during the life cycle of the project. It is better to automate this.
For this, we have used GitHub actions. GitHub action allows us to create simple declarative files that run on a certain condition, in our case whenever we push any new commits to the project repo. Just copy this file to the .github/workflows folder of your repo, type your desired tag instead of project: version in the file.
The work is not done yet. Docker push command actually requires you to login to your Docker account. Entering your username and password on your repository is not safe practice, so we have used GitHub secrets to store the username and password.
Simply create two new GitHub secrets with name DOCKER_USER and DOCKER_PASSWORD with your username and password respectively.


Now the first step is complete. You will notice every time you push commits to the repository it automatically builds and pushes the new container image to Docker Hub.
Setting up Kubernetes Cluster
We have used ansible to setup the cluster. The benefit of using ansible is it requires no client software so no preparation needs to be done on worker nodes, this is especially beneficial in clusters with large number of nodes.
You will find a directory Kube_Ans_setup in the repo. In the directory there are multiple playbooks, a shell script, and a bunch of config files.
A playbook is basically a plan that ansible executes. It is a declarative file, just open any playbook from the playbooks directory.
A playbook starts with describing the hosts on which it is to be run. Then we might have a declaration for all the variables we would use. Then finally the tasks which we want to perform. Tasks are defined with modules and their arguments. For example the shell module executes the command we pass as arguements
First things first open the host files. This file decides what ips the playbook will work on enter your master and worker nodes ips here.
After that open the env_variables folder in this edit the master node ip and the CIDR range for the pods.
Once that is all done, we are ready to run the playbooks. Since there are a number of playbooks we created a shell script to run them. Run the Settings_deploy.sh script and it will start running the playbooks.
First thing we do is disable swap memory on all nodes. The reason we do this is because, using swap memory makes a pod slow and in Kubernetes instead of having a slow pod we can simply close the pod and start a new one.
We then run a playbook to install the necessary packages to run Kubernetes. To know which packages, we use open the env_variables file and check the packages variable. We also enable ports 6443 for the dashboard and 10250 for logs.
We then configure the master node to start a Kubernetes cluster and save the token. The token is later used while configuring the worker nodes to join the cluster.
Done.
The worker nodes will join the cluster in a few minutes.
Deploying the Container Image
Once the cluster is setup and all the worker nodes have joined, we just need to deploy our image.
To do that first edit the deployment.yml file in the repository with the name of the image you created in step 1, and the number of replicas you require.
Send this file to the master node and then simply use the command
kubectl apply -f deployment.yml
Kubernetes should pull the images on all pods and start running the application. Go to http://localhost:8080 to check the output


1 comment
Informative!!