In this article, we will be discussing how to add a wrapper around MLflow model implementation and metadata. Before going directly into the wrapper, Let’s discuss and makes a basic understanding of MLflow and why we want to use it.
MLflow, why should we use it?
Mlflow is a framework developed by Databricks that supports managing the end-to-end machine learning lifecycle. That means it can store models, has components to monitor your model during training and testing, load the model in production, create a pipeline. It has four components and all these components can be used independently:
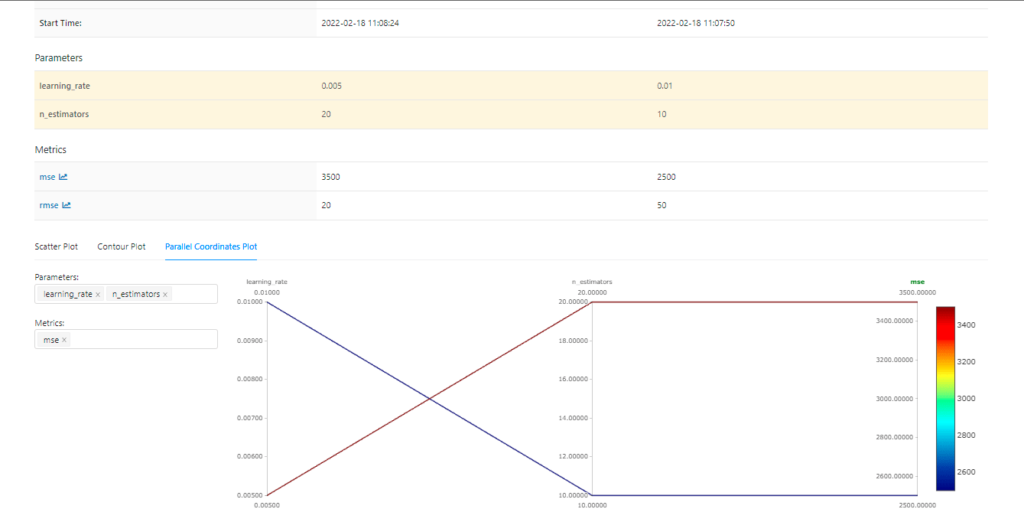
- MLflow Tracking: As data scientists or ML engineers, we repeatedly train our models for better performance. And keeping track of all the parameters or metrics for comparing models is a bit tedious. Mlflow Tracking API is the solution for our problem as it keeps track of all the parameters and metrics so that after a run, we can compare the output to the previous run to check whose performance is better.
- MLflow Projects: All software developed follows an architecture pattern but Machine Learning doesn’t have something like that. Because every ML model has a different set of requirements and design so it becomes difficult to share the code and setup model across different systems in a team. MLflow Project has a standard format for packaging reusable data science code. Each project is a simple directory that contains your code, requirement file, conda environment file, extra metadata like parameters, project version, git commit, etc.
- MLflow Models: As a data scientist, it’s easier to create a model than to deploy it. But MLflow models help you make your model ready for deployment by packaging based on the flavors like Tensorflow, sklearn, pyfunc, etc. Packaging a model includes what environment your model requires, what is the signature of your model i.e format of model’s input and output? Once we have packaged the model, we can store it in a pickle file and deploy it using MLflow models.
- MLflow Registry: As we keep on improving our models with new data, we will have multiple versions of models with different metrics and parameters. We might have different models in different stages like production, staging, etc. To help us keep track of model stages, MLflow has a centralized model store, set of APIs, and UI called MLflow Model Registry.

Now we have a basic understanding of mlflow and how is it useful for us. Let’s move forward and learn something about MLflow wrapper so that we can put it into practice.
What’s a Wrapper?
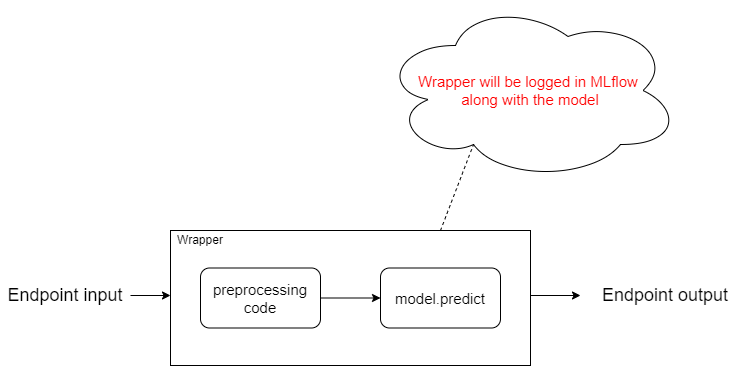
Let’s take a simple example to understand wrapper. When we train a model, we use some preprocessing steps to make our input feedable to the model. But we can’t expect the user to follow the same preprocessing steps.
Assume we are training an image classification model with the dataset containing images, but our model takes a NumPy array so to make our input feedable, we have to convert all images into their equivalent NumPy array. But we don’t want our users to follow the same steps. So we will create a Wrapper around the model with the preprocessing code so, when somebody tries to hit the API, it will automatically convert the image into the NumPy array and feed it to the model to get the prediction.
Now we have an understanding of wrappers, it’s time to apply them in practice.
Let’s Code !!!
So We have a digit classification model which accepts a NumPy array as an input and returns the digit class. In the below code snippet, we are: importing the libraries required, setting the Tracking URI, loading our ML model.
#importing Libraries
import pickle
import mlflow
import wrapper
import os
import keras

#Set Tracking Uri
mlflow.set_tracking_uri("sqlite:///mlruns.db")

#Loading the digit classification model
model = keras.models.load_model("digit_classification_model_keras_w_post_processing")
print ('Loaded Model')
Note: You will also need to set the tracking URI in the environment variable [MLFLOW_TRACKING_URI]
As we know every library has its own way of loading and predicting, for a model stored in a pickle format we use, for a Keras-based model we use keras.models.load_model() , etc. The same goes with the model prediction, for spacy, we have a prediction function nlp2(), some libraries use model.predict().
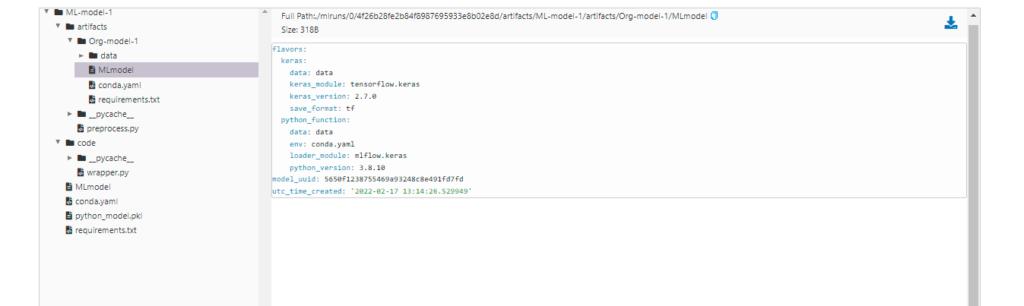
So we will try to create a generic wrapper that can work with any type of image classification model which takes an image URL as an input and returns the prediction. In the below code snippet firstly we have saved our model in MLflow format and later log it with pyfunc along with the wrapper.
with mlflow.start_run():
    active_run = mlflow.active_run()
    mlflow.keras.save_model(
        model,
        "Org-model-1"
        )

    print("Active run_id: %s",active_run.info.run_id)

    artifacts = {
    "Original_model": "Org-model-1"
    }

    model_data = mlflow.pyfunc.log_model(
        artifact_path="ML-model-1",
        python_model=wrapper.TestWrapper(),
        artifacts=artifacts,
        code_path = ["wrapper.py"],
        )

    registered_model_name="digit-classification"
    mv = mlflow.register_model(model_data.model_uri, registered_model_name)
Here is our wrapper code, which takes an image URL, downloads and converts the image into black-and-white, then converts it into NumPy array, and finally uses the NumPy array to get the prediction.
import mlflow
from PIL import Image
import requests
from pathlib import Path
import numpy
class TestWrapper(mlflow.pyfunc.PythonModel):
def load_context(self,context):
self.model=mlflow.pyfunc.load_model(context.artifacts["Original_model"])
def predict(self, context, model_input):
print ("Invoking predict with \n", model_input)
image = requests.get(model_input, allow_redirects=True).content
path = Path(model_input).name
open(path, 'wb').write(image)
image = Image.open(path).convert("L")
image = numpy.asarray(image)
image = image.reshape(1, 28, 28)
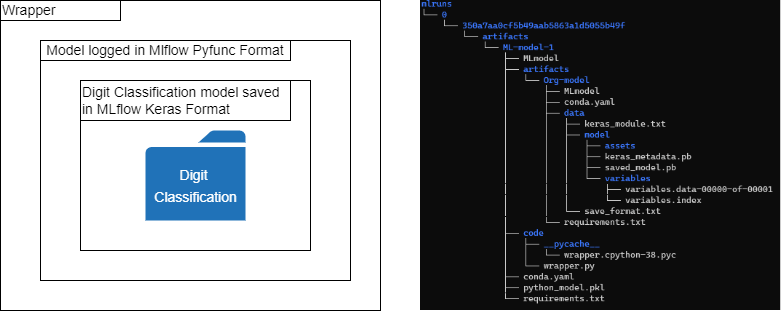
return self.model.predict(image)We logged our digit classification model as an artifact in our pyfunc model. So as you can see, now in the wrapper, it doesn’t matter in which library it was trained. We can load every model using pyfunc.load_model and predict using the model.predict().
How to Invoke the model?
Now, as we have logged and registered our model, there are three ways we can invoke this model :
- Using the code: Here is the code snippet through which you can invoke your model and get the prediction
import mlflow.pyfunc

mlflow_pyfunc_model_path = "models:/digit-classification/latest"

# Load the model in `python_function` format
loaded_model = mlflow.pyfunc.load_model(mlflow_pyfunc_model_path)


test_predictions = loaded_model.predict("https://i.picsum.photos/id/185/28/28.jpg?hmac=a6U5ybj0Ogd8H1WFpK6nxc9jGBRNcUD1mL8Ea7JUUjw")
print ("---------------------- output --------------------- ")
print(test_predictions)- Using MLflow server: We will open the server using the below command then you can hit the model at port 2000 using the curl command.
mlflow models serve -m models:/digit-classification/latest -p 2000 --no-conda
- Using docker image: We can create the docker image using the below command, then we will run the container and can invoke the model using the curl command.
mlflow models build-docker -m "models:/digit-classification/latest" -n "digit-classification"
docker run -p 5001:8080 "digit-classification"
Conclusion
- Basic Understanding of MLflow
- Components of MLflow
- Wrapper and how to integrate it with our code
That’s all for now. Until next time! 👋