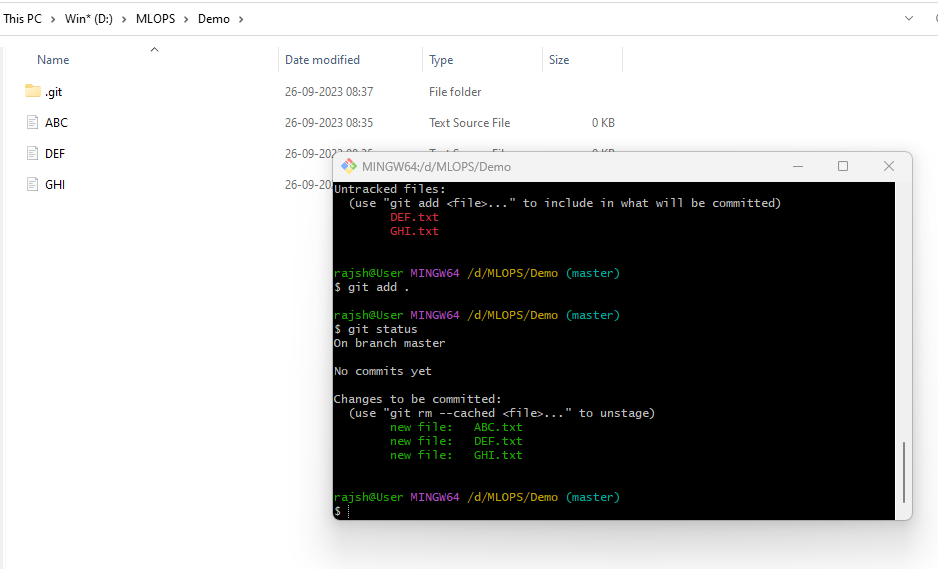
The git command is used to transfer the files from the project folder which is also known as a workspace to the repository (.git folder). The files in the workspace are also known as files are untracked files and our first job is to transfer the files from un-tracking to track using git command.
The tracking mode is known as the staging area, the place where can we make alterations or modifications in files before the final commit. Yes, we can do the same at any step but this is the place where we do maximumly. After transferring the un-track files to the staging area, now next work is to commit it into the repository.
let’s see some git commands.
Git Status
Syntax: git status
This command shows what is the status of the repository right now.
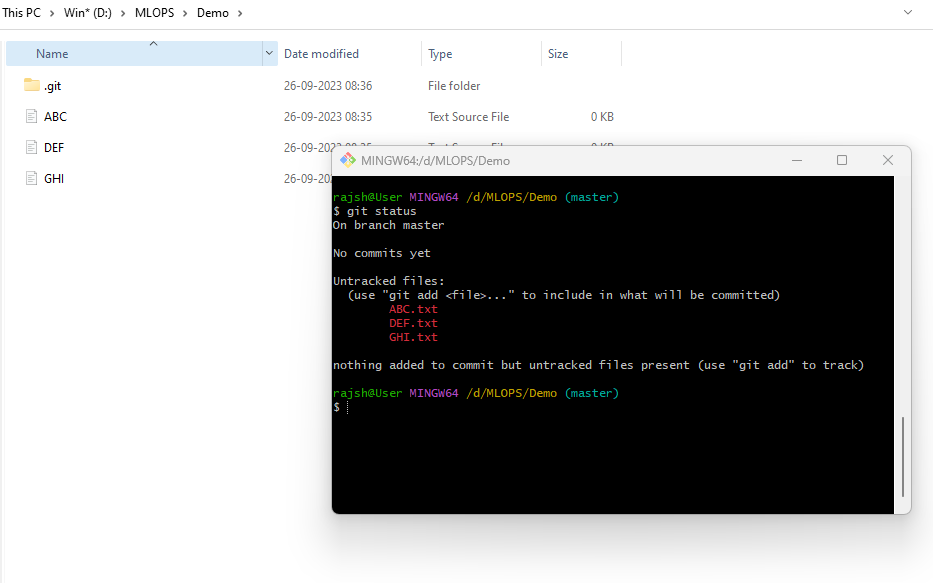
The ‘git status’ command is a fundamental Git command that provides information about the current status of your working directory and the state of your Git repository. When you run git status, git will display:
On branch
This line indicates the name of the current branch you are working on. It’s crucial to know which branch you are on because your changes and commits will be associated with this branch.
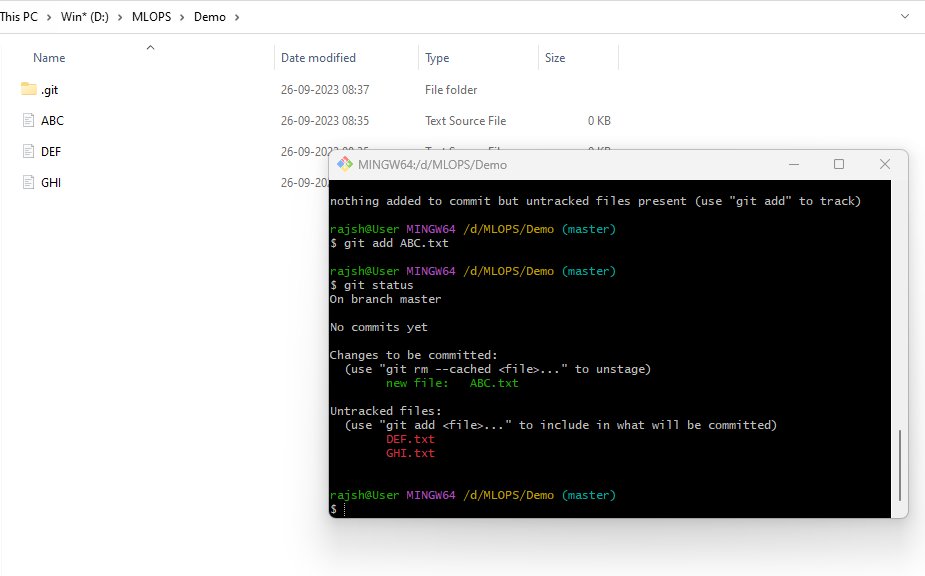
Changes not staged for commit
This section lists files in your working directory that have been modified but are not yet staged for commit. Git informs you that these changes are not included in the next commit.
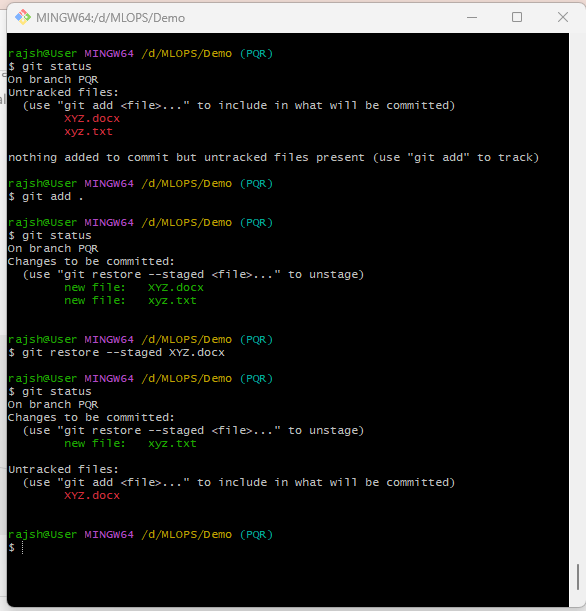
Untracked files
This section lists files in your working directory that git is not tracking. These are typically new files that you haven’t added to the repository yet. Git suggests using git add to start tracking these files.
Changes to be committed
This section lists files that are staged and ready to be included in the next commit. Files in this section will be part of the upcoming commit when you run the git commit.
The ‘git status’ helps you keep track of your progress and what needs to be committed or staged. It’s an essential command to use regularly when working with git to ensure you have a clear understanding of the state of your repository before making new commits.
When there is no repository.
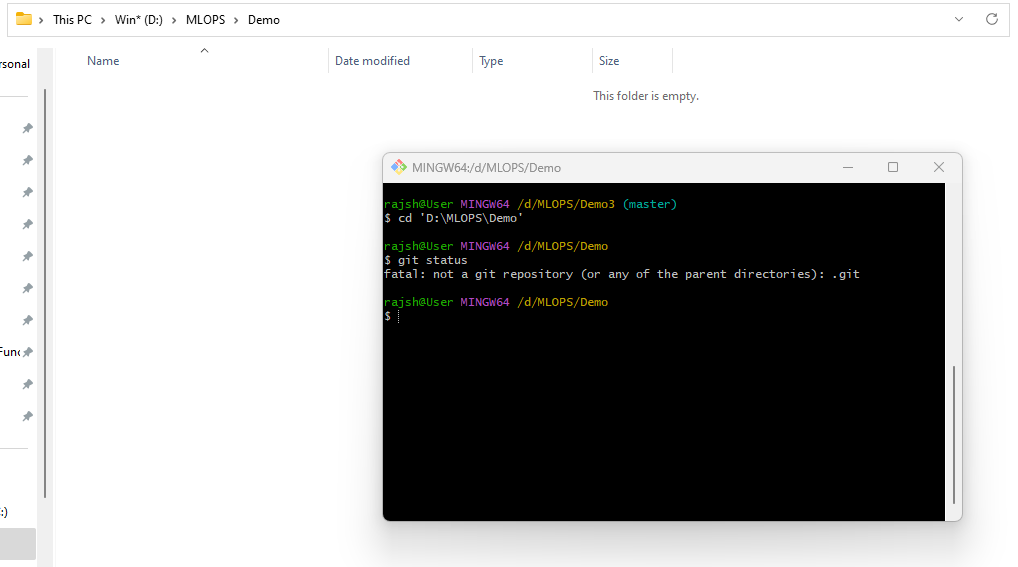
Git INIT
The ‘git init’ is a fundamental Git command used to initialize a new git repository in a directory. When you run this command, it sets up all the necessary files and data structures that git needs to start tracking changes in your project.
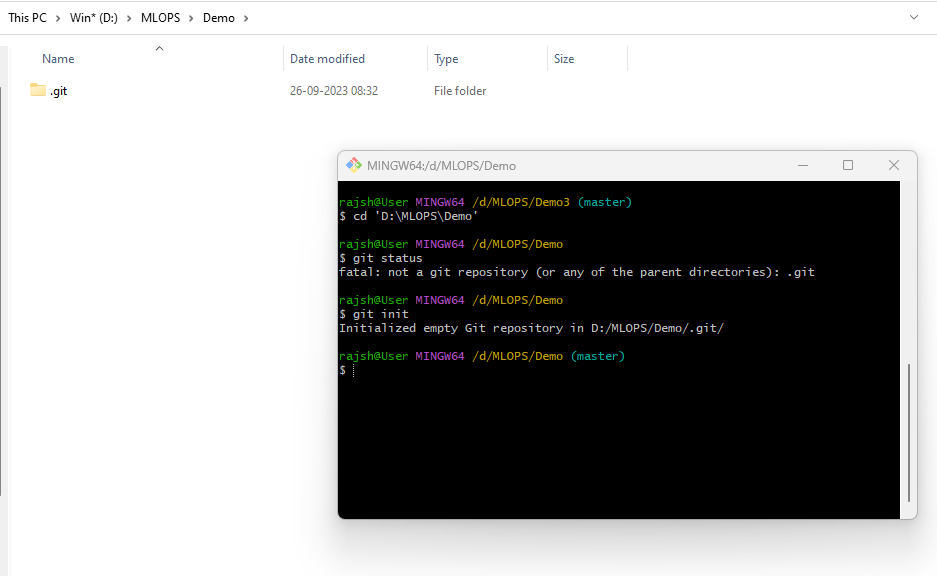
Syntax: git init
The ‘git init’ is the command you use to start a new git repository from scratch or to initialize version control in an existing project folder. This command creates a hidden subdirectory within your project folder called ‘ .git’, where Git stores all of its configuration files, object database, and other essential repository data. Once you’ve run ‘git init’, your project folder becomes a git repository, and you can start using git to track changes, create commits, and manage your project’s version history.
Common Use Cases:
Starting a New Project
The primary purpose of ‘git init’ is to begin tracking changes in a new project or directory that has not been under version control before. By initializing a git repository, you can start committing and managing changes right from the beginning of your project.
Initializing an Existing Project
You can also use ‘git init‘ in an existing project directory that was not previously tracked by git. This allows you to introduce version control to an ongoing project.
When you run git init, git creates a .git subdirectory in the current directory. This subdirectory is hidden (indicated by the . prefix), and it contains all the necessary files and configurations for Git to work within the repository.
Inside the .git directory, Git sets up the following components
- Object Database: Git stores all the file changes and their history as objects within this database.
- Configuration Files: Git creates various configuration files that define repository settings and options.
- Hooks: Git also sets up a directory for hooks, which are scripts that can be triggered at various points in git’s workflow.
- References: Git initializes a default branch called master (though this may vary depending on your Git version and configuration). This branch is where your initial commits will be stored.

Git Add
Staging:
When you run ‘‘git add”, the selected changes are moved to the staging area (also called the “index”), which acts as an intermediate step between your working directory and the commit. This allows you to review and organize your changes before committing them. Running git add-on those files will start tracking them, making them part of your repository’s history.
Syntax: git add
While ‘git add . ‘ can be convenient for quickly staging all changes, it’s important to review the changes using git status afterward to ensure that everything you intend to commit is correctly staged, as it may include changes you didn’t intend to commit.
Syntax: git add .
Git Reset
The ‘git reset’ is a powerful Git command used to manipulate the current branch’s commit history and the staging area (index). The HEAD represents the latest commit on the current branch, and the ‘ –‘ is used as a separator to specify the paths or files you want to affect. When used with the ‘–‘ separator, git reset is typically used to unstaged changes from the staging area, effectively “un-committing” them.
HEAD
HEAD is a special pointer in git that points to the latest commit in the current branch. It represents your current position in the commit history.
— Separator
The ‘–‘ is used to separate the git reset command from the paths or files that follow. It’s important to use ‘–‘ when dealing with file paths to avoid confusion.
One common use of git reset ‘HEAD –‘ is to unstaged changes that you had previously added to the staging area using git add. When you run this command without specifying any file paths, it effectively removes all changes from the staging area, but it does not discard the changes in your working directory.
Syntax: git reset HEAD —
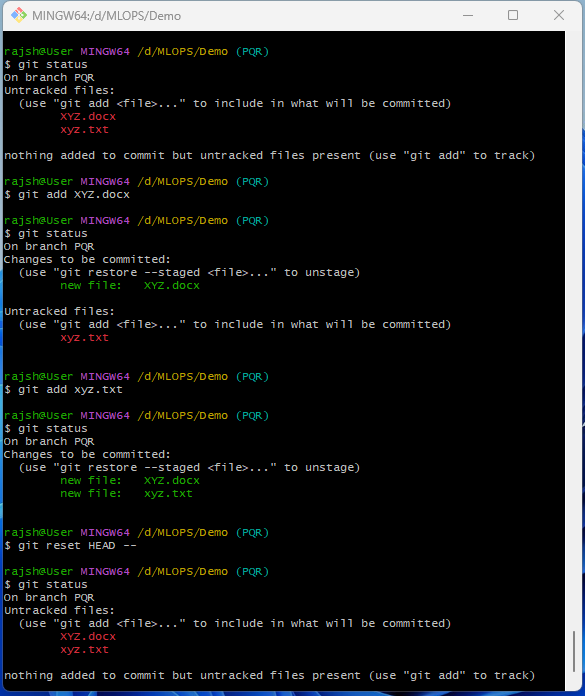
Syntax: git reset HEAD — [FileName]
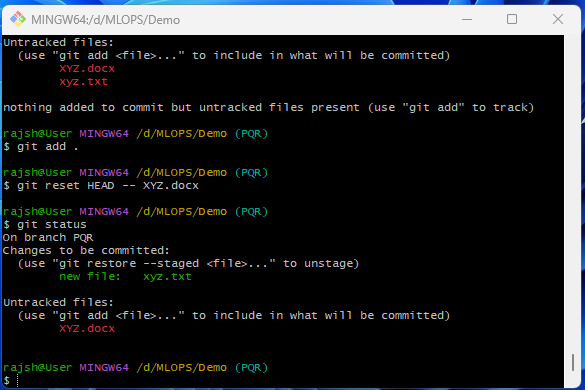
You can use ‘git reset HEAD — [file]’ to unstaged changes for a specific file while leaving other changes in the staging area intact. This is helpful when you want to reorganize your commits or separate unrelated changes.
Git Remove
Syntax: git rm –cached
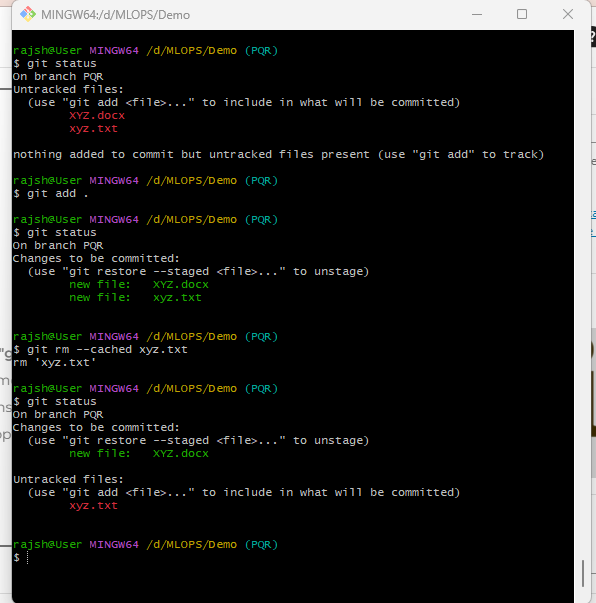
Description:
This is the primary command used for removing files from git’s version control. ‘git rm’ stands for “git remove.” It is used to remove files from both the git repository and the working directory. However, when used with the ‘–cached‘ option, it removes the file from the git repository but keeps it in your working directory, effectively “un-tracking” the file while retaining its local copy, that means file should be removed from the git repository (i.e., it will not be included in future commits), but it should remain in the working directory. This option is useful when you want to stop tracking a file but keep it on your local machine.
Git Restore
The ‘git restore –staged’ command is used to unstaged changes from the staging area for a specific file in your git repository. This is used to manage changes in your working directory. that means when you run git restore –staged , git moves the changes that were in the staging area for the specified file back into your working directory. ‘–staged’ is an option that specifies that you want to unstage changes from the staging area. In other words, it moves changes that were previously added to be committed back into the working directory.
The primary purpose of git restore ‘–staged’ is to undo the staging of changes that you previously added using git add. This can be helpful when you want to reevaluate which changes you want to include in your next commit or if you accidentally staged changes you didn’t intend to commit.
Syntax: git restore –staged file.txt
Note
After using ‘git restore –staged’, you should run git status to verify that the changes have been correctly unstaged. If everything looks as expected, you can proceed to make any further changes in your working directory and then commit them using git commit.
Git Commit
Load the track files in the repository, and files from the staging area to the repository. The ‘git commit -m’ command is used to record the changes you’ve staged in the staging area and save them as a new commit in your git repository. The primary purpose of ‘git commit -m’ is to create a new commit with a descriptive message summarizing the changes made in that commit.
Syntax: git commit -m ‘message’
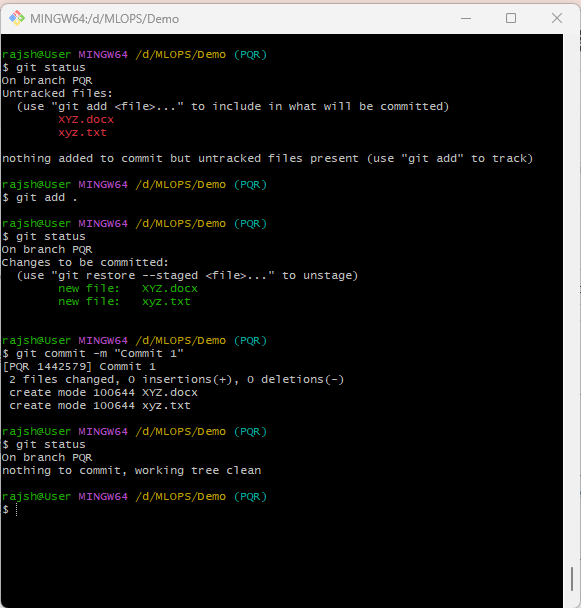
- ‘git commit’ is one of the fundamental git commands used to create a new commit. A commit represents a snapshot of your project at a specific point in time and stores the changes you’ve made.
- ‘-m’ is an option that allows you to provide a commit message directly on the command line, which is a brief, descriptive note explaining the purpose or significance of the commit.
- is the commit message you want to associate with the commit. It should be enclosed in quotation marks.
git commit -m “Add new feature: user authentication”
In this example, a commit is created with the message “Add new feature: user authentication,” indicating that the commit includes changes related to adding user authentication to the project.
- When you run git commit ‘-m’ , Git takes all the changes that are currently staged (added to the staging area) and creates a new commit based on those changes.
- The commit is given a unique identifier (a SHA-1 hash) and is added to the commit history of your git repository.
- The commit message you provide is associated with this commit, making it easier for you and others to understand the purpose of the commit when reviewing the history.
- Keep commit messages concise and descriptive, explaining what the commit does and why it was made.
- Use the imperative mood in commit messages (e.g., “Add,” “Fix,” “Update”) to describe actions rather than stating the changes made.
- Make frequent, small, and focused commits to improving the clarity and traceability of your project’s history.
Git Log
The ‘git log’ command is used to display a detailed and chronological history of commits in a ‘git repository’. It provides a comprehensive view of the commit history, showing who made each commit, when it was made, and the commit messages associated with each change. The primary purpose of the git log is to examine the commit history of a git repository. It provides a detailed record of all commits made to the repository, making it useful for tracking changes and understanding the project’s development history.
Syntax: git log
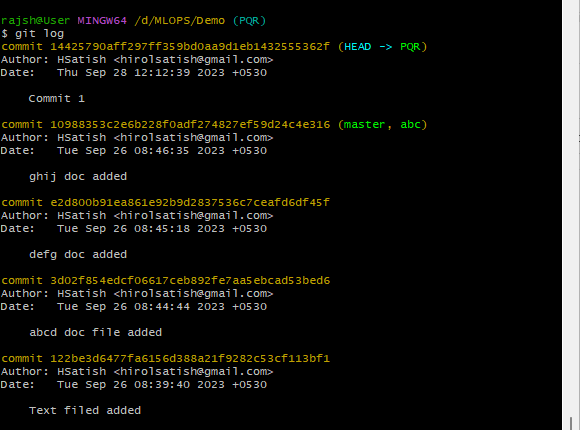
- The ‘git log’ is a command that retrieves and displays the commit history of the current branch in your Git repository.
- When you run the ‘git log’ without any options or arguments, it will show a list of commits in reverse chronological order, starting with the most recent commit and going backward in time.
Customizing Output
git log –since=”2023-01-01″ –author=”John Doe”
‘git log’ offers various options and arguments to customize the output to suit your needs. For instance, you can use options like ‘–since’, ‘–until‘, ‘–author‘, and more to filter and refine the displayed commit history.
Note To navigate through the commit history displayed by the git log, you can use keyboard shortcuts. Press q to exit the log view.
Git Log –Pretty=Online
This command is used to display a simplified and compact view of the commit history in a git repository. It formats the commit information to show each commit as a single line, making it easier to quickly scan the history. The primary purpose of ‘git log –pretty=oneline’ is to provide a simplified and condensed view of the commit history. This is useful for quickly scanning commit messages and identifiers without the verbosity of a full commit log.
Syntax: git log –pretty=oneline
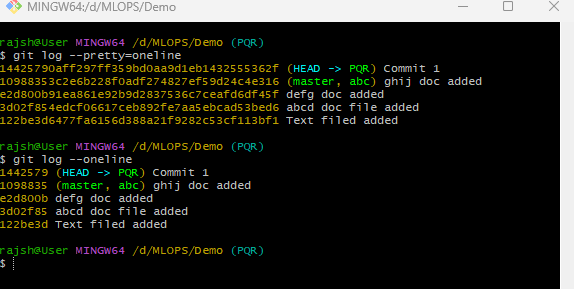
- ‘git log’ is the command to view the commit history of a Git repository.
- ‘–pretty=oneline’ is an option that customizes the output format of the commit history. Specifically, it formats the commit information to display each commit as a single line, providing a concise overview of the commit history.
When you run git log –pretty=oneline, Git retrieves the commit history for the current branch, just like the regular git log command.
- However, the output format is customized to display each commit as a single line, containing
- A unique identifier (SHA-1 hash) for the commit.
- The commit message (typically truncated for brevity).
- Commits are displayed in reverse chronological order, starting with the most recent commit.